1.Introduction
This is the manual for the integration between Opencart and Visma eAccounting.
- This integration is a financial integration. It is not a logistics integration. It is not suitable for updating customers in Visma eAccounting, printing packing slips, or synchronizing products/inventory.
- This integration does not replace the work of an accountant. It saves time because you no longer have to retype documents. The accountant is still needed for advice, expertise, and control.
Tip: Other customers using this integration found the tips in the FAQ for Opencart and in the FAQ for Visma eAccounting.
Installing the integration starts with signing up for a trial period, via our integrations page. After registration, you will receive an email containing an installation URL and login details. With this installation URL, you start the installation of the integration.
The installation is complete when both connection dots are green, and the settings in the Configuration tab have been entered and saved.
There is a trial period of 30 days.
If you want to install another integration, you can do so in the same way. Make sure you are logged out of the integration dashboard and preferably start the new installation in an incognito browser.
At the end of the trial or subscription period, the integration will not be automatically renewed. You will receive an offer for a one-year subscription or renewal by email at the end of this period. You can confirm the renewal by using the payment link in that email. Do you want to terminate the integration in the meantime? This can be done via the dashboard, tab Profile>>Cancel integration.
Are you switching to another web shop/accounting system and do you want to re-establish a connection? In this faq we explain how to do this.
We advise you to revoke the API key and remove the extension from your webshop when uninstalling the integration.
2.How the integration works
New orders from your webshop are retrieved from the webshop at least once per hour. The status of the order is reviewed, and if the order is allowed to be processed, this will occur. If the orders are not yet allowed to be processed, they are checked every night to see if the status has changed and the order can be processed.
Read more How the integration works .... Read less How the integration works ....
At the start of processing an order, we perform a number of checks on the Opencart order:
- It is checked whether the total of the Opencart order is equal to the sum of the amounts in the order lines plus the shipping cost amount.
- If the order is an ICP order, the VAT number is checked.
- It is checked whether a corresponding VAT code exists in Visma eAccounting for the VAT in each line.
- It is checked whether the order has not already been processed.
Processing a Opencart order to Visma eAccounting takes place in three steps:
- It is checked if the customer already exists in Visma eAccounting. If not, the customer is created. Matching is based on the email address.
- When processing to Visma invoices or orders, it is checked whether products are already present in Visma. Missing products are added.
- The Visma eAccounting invoice, order or sales booking is created and processed.
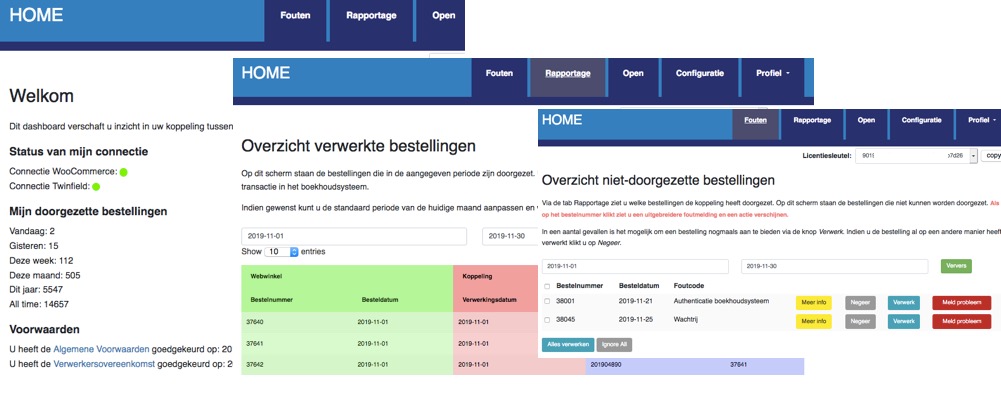
After the order has been forwarded and a success message from Visma eAccounting has been received, the order is marked as handled. The Opencart order appears at the Reporting tab on the dashboard.
If Visma eAccounting returns an error while processing the order, the order appears in the Errors tab on the dashboard. Via the yellow button More info more information about the problem can be found. Via the red button Report problem can the order with all necessary information easily be submitted to us after you have tried to resolve the problem yourself. If the problem is solved, in some cases the orders can be processed again with the blue Process button.
Data
Information about the data that is processed can be found in the section Day-to-day: To Visma eAccounting later in the manual.
3.Required: OpenCart Secret key
The integration uses an OpenCart module. You can download this module here:
- cloudinvoiceopencart2.3.zip (OpenCart version 2.3)
- cloudinvoiceopencart3.zip (OpenCart version 3)
You install the extension on your webshop via FTP. You will see the Settings cloudinvoice platform module appear under Modules in your administration panel.

Click on Install to install the module and then on Edit to configure the connection. The license key is the key you received in the registration email. You create the API key to read orders and tax rates from OpenCart yourself. You can think of this API key as a kind of password. Just like with regular passwords, a complex password means you are protecting your data even more. We therefore advise you to enter an API key with a length of at least 15, consisting of numbers, letters, uppercase letters, and the punctuation marks !, *, @, #, (, ) and =. Compose your API key carefully. A good API key makes the connection much more secure. The maximum length of the API key is 64.

4.Installation
Installing the integration starts with signing up for a trial period, via our integrations page. After registering, you'll receive an email with an installation URL and login details. Use this installation URL to start the integration installation.
Activating the integration consists of three steps:
1. Establishing the connection with the OpenCart webshop. Through this step, you authorize the integration to read the data from your webshop.
2. Establishing the connection with Visma eAccounting. This authorizes the integration to write transactions to your Visma eAccounting administration and read information.
3. Configuring additional data, such as the VAT settings.

Authentication with your OpenCart webshop is done via the API key you created in a previous section. Click the red Connect button next to OpenCart and enter the API key in the popup window. If the connection is correctly established, the indicator will turn green. If the connection is not established, check that the API key has a maximum length of 64 and that the license key was not accidentally entered.

Connection Visma
The connection with Visma is established via OAuth. Make sure you are logged out of Visma before starting the connection. You now click on the red Connect button. A login screen for your Visma account appears automatically. When you log in, you will get a screen asking if you allow the connection. If you confirm this, the connection with Visma is established.

Here you can specify the account for debtors (1200, 1300 or 1600, you can check this in Visma eAccounting), the payment condition for new debtors and the default unit. Our advice is to select PCE or 'per piece' for the default unit,

When configuring the VAT rates and general ledger accounts, a link is created between the VAT rates in webshop and the VAT codes and revenue accounts in Visma eAccounting. You can always make changes by clicking the blue 'Edit' button and selecting an option from the drop-down menus.
By default, all EU countries are shown in the list. You only need to configure the countries you sell to, and - if applicable - ICP and International.
The integration shows the standard VAT rates for Europe. You can adjust the VAT percentage with which you sell - left column. For example: By default, sales to Germany are set to 21%, but if you sell in the webshop with 19%, you can adjust that in the left column. Intra-Community (ICP) and international deliveries
The Intra-Community supplies / ICP option is intended for business-to-business deliveries within the EU. These sales are invoiced with 0% VAT. A VAT number from the customer is required. The International option applies to deliveries outside the EU. For these sales, the integration expects 0% VAT; otherwise, the sales cannot be processed. Separate VAT codes and general ledger accounts can be configured for both ICP and international deliveries.
Once the VAT settings have been configured and saved, you will always see the selected VAT rates. If you want to start over, you can use the grey 'Remove VAT settings' button. Your current settings will then be deleted and you can begin again.

When you process payments, a link is created between the payment methods in your webshop and the clearing accounts from Visma eAccounting. Orders with a payment method from the list will always be posted to this debtor. No new debtors will be created in this case.
Note: It is not possible to set fixed debtors for ICP orders. For an ICP order, a valid VAT number must be transmitted. Therefore, a debtor will always be created in Visma eAccounting for an ICP order.

5.Day-to-day: From OpenCart
In this section, we show how we retrieve the orders from the webshop.
Once an order has been processed, it cannot be processed again. Any order changed in the webshop after it has been processed will not be updated in Visma eAccounting.
6.Day-to-day: To Visma
This is the manual for the integration between Opencart and Visma eAccounting.
- This integration is a financial integration. It is not a logistics integration. It is not suitable for updating customers in Visma eAccounting, printing packing slips, or synchronizing products/inventory.
- This integration does not replace the work of an accountant. It saves time because you no longer have to retype documents. The accountant is still needed for advice, expertise, and control.
Tip: Other customers using this integration found the tips in the FAQ for Opencart and in the FAQ for Visma eAccounting.
Installing the integration starts with signing up for a trial period, via our integrations page. After registration, you will receive an email containing an installation URL and login details. With this installation URL, you start the installation of the integration.
The installation is complete when both connection dots are green, and the settings in the Configuration tab have been entered and saved.
There is a trial period of 30 days.
If you want to install another integration, you can do so in the same way. Make sure you are logged out of the integration dashboard and preferably start the new installation in an incognito browser.
At the end of the trial or subscription period, the integration will not be automatically renewed. You will receive an offer for a one-year subscription or renewal by email at the end of this period. You can confirm the renewal by using the payment link in that email. Do you want to terminate the integration in the meantime? This can be done via the dashboard, tab Profile>>Cancel integration.
Are you switching to another web shop/accounting system and do you want to re-establish a connection? In this faq we explain how to do this.
We advise you to revoke the API key and remove the extension from your webshop when uninstalling the integration.
7.Support
Read more Support .... Read less Support ....
Explanation tabs dashboard
On the Dashboard >> Report you can see which orders from your Opencart webshop, and when, have been transferred to Visma eAccounting.What if orders are missing in Visma eAccounting
If orders are missing in Visma eAccounting we recommend following the steps below:- Log in to the dashboard: https://uwkoppeling.webwinkelfacturen.nl. The username and password are included in the registration email.
- Go to the Errors tab and check if order is there. You may need to adjust the search period if the
order is from a previous month. If you find order in this overview:
- Check the error code and verify whether you can resolve it yourself.
- If yes resolve the issue and click the blue Process button to resubmit the order.
- If not use the red Report problem button to create a ticket with us.
- Note if there are multiple errors, please create only 1 or 2 tickets. We will automatically see the other issues.
- Go to the Report tab and see if order is listed there. If so, you'll often see an identifier for Visma eAccounting (in the purple section of the overview) that you can use to search for order.
- Go to the Open tab and check if order is there.
- If you cannot resolve the issue, you can always create a ticket via the green Ask us button.