1.Introduction
This is the manual for the integration between Prestashop and Lundify.
- This integration is a financial integration. It is not a logistics integration. It is not suitable for updating customers in Lundify, printing packing slips, or synchronizing products/inventory.
- This integration does not replace the work of an accountant. It saves time because you no longer have to retype documents. The accountant is still needed for advice, expertise, and control.
- Please note: Bjorn Lunden Lundify does not support OSS. This integration is therefore not suitable for OSS. If your webshop falls under OSS regulations, the advice is not to use this integration, or only for non-OSS sales.
Tip: Other customers using this integration found the tips in the FAQ for Prestashop and in the FAQ for Lundify.
Installing the integration starts with signing up for a trial period, via our integrations page. After registration, you will receive an email containing an installation URL and login details. With this installation URL, you start the installation of the integration.
The installation is complete when both connection dots are green, and the settings in the Configuration tab have been entered and saved.
There is a trial period of 30 days.
If you want to install another integration, you can do so in the same way. Make sure you are logged out of the integration dashboard and preferably start the new installation in an incognito browser.
At the end of the trial or subscription period, the integration will not be automatically renewed. You will receive an offer for a one-year subscription or renewal by email at the end of this period. You can confirm the renewal by using the payment link in that email. Do you want to terminate the integration in the meantime? This can be done via the dashboard, tab Profile>>Cancel integration.
Are you switching to another web shop/accounting system and do you want to re-establish a connection? In this faq we explain how to do this.
We advise you to revoke the API key in Prestashop when uninstalling the integration.
2.How the integration works
New orders from your webshop are retrieved at least once per hour. If they have the correct status, they are processed to Lundify. You can set the statuses via the dashboard, tab Configuration.
Read more How the integration works .... Read less How the integration works ....
At the start of processing an order, we perform a number of checks on the Prestashop order:
- It is checked whether the total of the Prestashop order is equal to the sum of the amounts in the order lines plus the shipping cost amount.
- If the order is an ICP order, the VAT number is checked.
- It is checked whether a corresponding VAT code exists in Lundify for the VAT in each line.
- It is checked whether the order has not already been processed.
Processing a Prestashop order to Lundify takes place in three steps:
- It is checked if the customer already exists in Lundify. If not, the customer is created. Matching is based on the email address.
- When processing to Lundify orders, it is checked whether the products from the Prestashop order are already present in Lundify. Missing products are created.
- The Lundify invoice is created and added.
3.Required: Prestashop API key
To create the API key in your PrestaShop webshop, go to Advanced parameters - Web services via the menu.

Click on Add New to create a new API key.

If you click Generate on the next screen, an API key will be automatically generated. You can also create an API key yourself, but it is safer to let the system do it. Also provide a description so that you know later what you are using the API key for.

Finally, you need to set the permissions for the API key. The integration only wants to read from the PrestaShop webshop. So, only select View permissions for the following items:
addresses
categories
countries
customers
order details
orders
order state
producten
statussen
taxes

4.Required: Lundify connection
A public key is required to connect to Lundify. You can find this key in your Lundify dashboard. Log in and go to Integrations. If you click on the right gear icon (2), a popup will appear. Activate the integration (3) and copy the key (the string in the box).
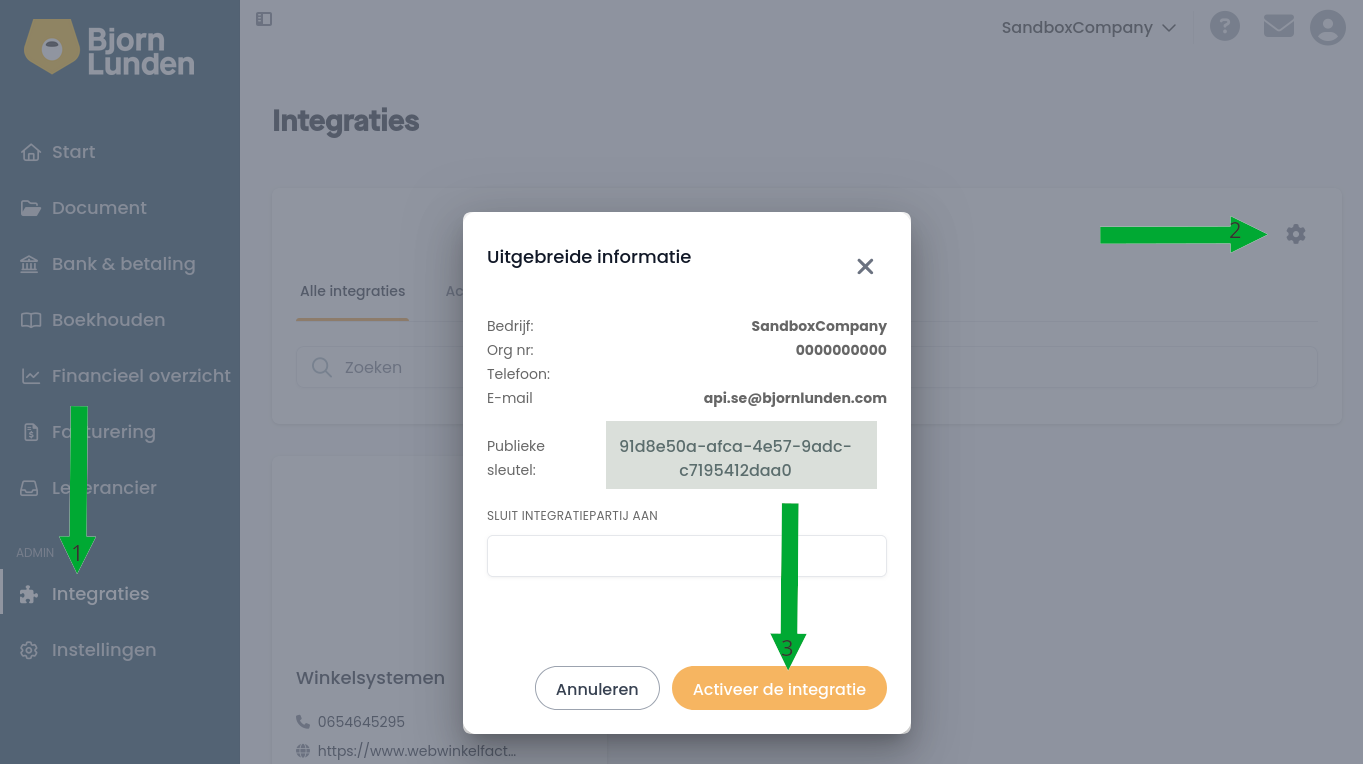
Then you log in on the dashboard https://uwkoppeling.webwinkelfacturen.nl. Enter the key in the Configuration, Authentication, or All Settings tab. This establishes the connection with Lundify.

5.Installation
After the installation, check using this FAQ, whether the integration works.
Installing the integration starts with signing up for a trial period, via our integrations page. After registering, you'll receive an email with an installation URL and login details. Use this installation URL to start the integration installation.
Activating the integration consists of three steps:
1. Establishing the connection with the Prestashop webshop. Through this step, you authorize the integration to read the data from your webshop.
2. Establishing the connection with Lundify. This authorizes the integration to write transactions to your Lundify administration and read information.
3. Configuring additional data, such as the VAT settings.
Read more Installation ....Read less Installation ....

Authentication with your PrestaShop webshop is done via the API key you created in a previous section. Click the red Connect button next to PrestaShop and enter the API key in the popup window. If the connection is correctly established, the indicator will turn green. If the connection is not established, check that the web service is enabled in the PrestaShop webshop.

Authentication Lundify
Establishing the connection with Lundify is done via the red Connect button in the Configuration tab. In the pop-up, you enter your Customer Code (this is the Lundify online 5-digit member number), and the token you created in the previous section. Please note, you need the entire code as a token, including the 1-part.
To use Lundify, select an administration within your account. You also indicate in which journal the revenue should be posted and what the debtors account is. The journal for processing (individual) orders will be a Sales journal.

When configuring the VAT rates and general ledger accounts, a link is created between the VAT rates in webshop and the VAT codes and revenue accounts in Lundify. You can always make changes by clicking the blue 'Edit' button and selecting an option from the drop-down menus.
By default, all EU countries are shown in the list. You only need to configure the countries you sell to, and - if applicable - ICP and International.
The integration shows the standard VAT rates for Europe. You can adjust the VAT percentage with which you sell - left column. For example: By default, sales to Germany are set to 21%, but if you sell in the webshop with 19%, you can adjust that in the left column. Intra-Community (ICP) and international deliveries
The Intra-Community supplies / ICP option is intended for business-to-business deliveries within the EU. These sales are invoiced with 0% VAT. A VAT number from the customer is required. The International option applies to deliveries outside the EU. For these sales, the integration expects 0% VAT; otherwise, the sales cannot be processed. Separate VAT codes and general ledger accounts can be configured for both ICP and international deliveries.
Once the VAT settings have been configured and saved, you will always see the selected VAT rates. If you want to start over, you can use the grey 'Remove VAT settings' button. Your current settings will then be deleted and you can begin again.

You can create a link here between the payment methods in the webshop and a fixed debtor in your Lundify administration. Orders with a payment method from the list will then always be posted to this debtor. In that case, no new debtors will be created.
Note: It is not possible to set fixed debtors for ICP orders. For an ICP order, a valid VAT number must be transmitted. Therefore, a debtor will always be created in Lundify for an ICP order.

6.Day-to-day: From PrestaShop
In this section, we show how we retrieve the orders from the webshop.
Once an order has been processed, it cannot be processed again. Any order changed in the webshop after it has been processed will not be updated in Lundify.
Please note: Due to the load on our systems, we go back a maximum of 3 months in time to check the status of orders and process them anyway. In addition, the number of orders that can be checked is limited to 300. Therefore, ensure that orders are completed in a timely manner so that the integration can process them and you do not have to manually re-enter them.
Field-level specification orders
| Below is an elaboration at field level when retrieving orders. The general values in the order, the order lines, discounts, surcharges are addressed, the shipping costs and the debtor details. | |
| Name field | Values from Prestashop order |
| Order-identifier | [id] |
| Order number | [reference] |
| Invoice number | [invoice_number] |
| Date | [date] |
| Order date | [date_add] |
| Status order | [current_state] |
| Payment method | [payment_details][method_title] |
| Total VAT order | [price][tax][amount] or - if [price][tax] consists of multiple lines, the sum of the [amount] fields of the [price][tax] lines |
| Order total incl VAT | [total_products_wt + total_shipping_tax_incl + total_wrapping_tax_incl - total_discounts_tax_incl] |
| Order total excl VAT | [total_products + total_shipping_tax_excl + total_wrapping_tax_excl - total_discounts_tax_excl] |
| Total VAT order | Order total incl - Order total excl |
| Delivery country | [], please note that the country of delivery is NOT used here. |
| ICP indication | The integration determines as follows whether it concerns an ICP order:
|
| International indication | The integration determines as follows whether it concerns an international order:
|
| To read the order lines, the integration takes the field [orderlines]. In Prestashop, order lines have different types. These are indicated by the field [type]. For the order lines, this concerns type article or type [custom]. | ||
| Name field | Values from Prestashop order line | |
| Productid | [articles][0][id] | |
| Amount | [quantity]. Please note, if the quantity is 0, the line is skipped. | |
| SKU | [articles][0][sku] if it is filled. If not, the product is retrieved from Prestashop and the SKU is determined based on that. | |
| Description | [description] | |
| VAT percentage | [price][rate], if smaller than 1, the VAT percentage is multiplied by 100. | |
| Line amount excl VAT | Amount in the field [price][amount] | |
| Line amount incl VAT | Amount in the field [price][amount_including_tax] | |
| Unit amounts | Divide the line item amounts by the amount | |
| VAT code and accounts Lundify | These are determined based on the settings, the VAT percentage and the delivery country. It also takes into account whether it is an ICP or international order. | |
| Only the payment method and possibly the set debtor are retrieved here. Payment costs are not in the Prestashop order, so they cannot be processed either. | ||
| To read the order lines, the integration takes the fields total_discounts_tax_excl] and total_discounts_tax_incl]. This concerns a discount on the entire order. The integration calculates the discount proportionally back to the VAT percentages in the shopping cart. | ||
| Name field | Values from Prestashop discountline | |
| Amount | 1 | |
| Description | Discount < |
|
| Line amount incl VAT | Relative with value [total_products_wt] | |
| Line amount excl VAT | Relative with value [total_products_wt] and the VAT percentage | |
| VAT code and accounts Lundify | These are determined based on the settings, the VAT percentage and the delivery country. It also takes into account whether it is an ICP or international order. | |
| Name field | Values from Prestashop surcharge-fields |
| Amount | 1 |
| Description | Surcharge |
| Amount excl VAT | [total_wrapping_tax_excl] |
| Amount incl VAT | [total_wrapping_tax_incl] |
| VAT amount | [total_wrapping_tax_incl] - [total_wrapping_tax_excl] |
| VAT percentage | Amount incl - Amount excl A percentage greater than 0.204 and smaller than 0.21 is rounded to 21%. |
| VAT code and accounts Lundify | These are determined based on the settings, the VAT percentage and the delivery country. It also takes into account whether it is an ICP or international order. |
| Name field | Values from Prestashop customer |
A customer's addresses must be retrieved separately in the webshop. This works as follows:
|
|
| Customer |
Customer fields
|
| Address |
Address-fields
|
7.Day-to-day: To Lundify
Creating invoices
The orders from Prestashop are imported into Lundify as an invoice. This invoice is also immediately posted as a journal entry. For each order, the VAT and general ledger account are provided as configured during the installation of the integration.
When creating invoices, new debtors may be added to Lundify. By default, no products are added to Lundify, and the text line from the Prestashop order appears in the Lundify invoice. It is possible to provide a product code. If you want this, please contact webcare@webwinkelfacturen.nl.
Cost center
It is possible to provide one default cost center to the Lundify invoice. One default cost center is possible per integration. Please contact webcare@webwinkelfacturen.nl stating the license key to make use of this.
When processing customer information, it is first checked whether the customer has been processed before. If so, this Lundify debtor is used as the debtor for the Lundify invoice. If the customer is not yet known, they are added to Lundify. Matching is based on email address. Please note: The integration only creates debtors. The integration does not modify debtors.
When processing to Lundify invoices incl. products, products that are not yet in Lundify will be added. See here for an explanation of how product codes are determined FAQ. The product is assigned the VAT code based on the VAT percentage in the order line and the general ledger account configured in the Configuration tab of the dashboard.
Please note: The integration only creates products. The integration does not modify products.
It is not possible to automatically send the created invoice in Lundify to the customer.
Field-level specification Lundify

| Name | Example | Note |
| Customer ID | 1011 | Debtor identifier in Lundify |
| Invoice date | 2025-06-01 | Sales date Prestashop order |
| Expiration date | 2025-06-15 | Standard 14 days, not adjustable |
| Comment | Please leave on the doorstep | Comment Prestashop order |
| Name | Sarah de Zwart | Debtor name according to Prestashop order |
| info@sponiza.nl | ||
| Address | Stationstraat 12 | |
| Postal code | 1234 AB | |
| City | Amsterdam | |
| Country | NL | |
| Recipient name | Mies Talenberg | |
| Shipping address | Dorpsstraat 152 | |
| Postcode - Shipping address | 2345 AB | |
| City - Shipping address | Heerlen | |
| Country - Shipping address | NL | |
| Invoice lines | ||
| Revenue account | 8000 | |
| Product-identifier | prod123 | Only if processing to products is enabled. |
| Amount | 3 | |
| Unit price excl. VAT | 1.50 | Please note: This is the unit price excl. VAT. |
| Line price incl. VAT | 4.91 | |
| VAT code | 2 | |
| Text | Birthday cake | |
| Name | Example | Note |
| name | Confectioner | Empty if there is no company name |
| street | Stationsweg 12 | Address |
| country | SE / NL | Invoice address country |
| email address | info@sponiza.nl | |
| phone no | 0623138822 | |
| Address details | ||
| entityid | 123 | Identifier Lundify debtor |
| Invoice address details | ||
| Name | Example | Note |
| entityId | prod123 | Identifier product |
| account | 8000 | Revenue account |
| name | Birthday cake | Product name |
| descriptionUK | Birthday cake with whipped cream and orange | Product description |
| Vatcode | 2 | VAT code |
| VAT account | 1500 | VAT account |
| costCenter | 001 | Default cost center |
| Because the prices from Prestashop are used, and a product is added once and not modified thereafter, no prices are provided with the product. | ||
8.Support
Read more Support .... Read less Support ....
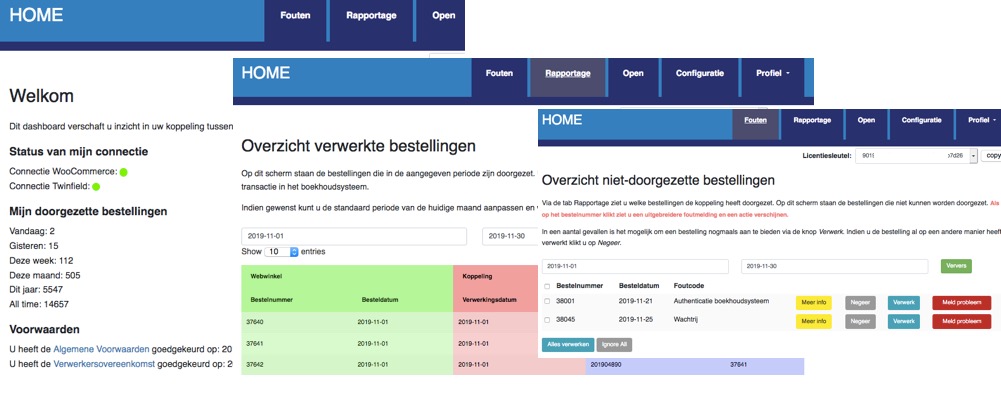
Explanation tabs dashboard
On the Dashboard >> Report you can see which orders from your Prestashop webshop, and when, have been transferred to Lundify.What if orders are missing in Lundify
If orders are missing in Lundify we recommend following the steps below:- Log in to the dashboard: https://uwkoppeling.webwinkelfacturen.nl. The username and password are included in the registration email.
- Go to the Errors tab and check if order is there. You may need to adjust the search period if the
order is from a previous month. If you find order in this overview:
- Check the error code and verify whether you can resolve it yourself.
- If yes resolve the issue and click the blue Process button to resubmit the order.
- If not use the red Report problem button to create a ticket with us.
- Note if there are multiple errors, please create only 1 or 2 tickets. We will automatically see the other issues.
- Go to the Report tab and see if order is listed there. If so, you'll often see an identifier for Lundify (in the purple section of the overview) that you can use to search for order.
- Go to the Open tab and check if order is there.
- If you cannot resolve the issue, you can always create a ticket via the green Ask us button.